
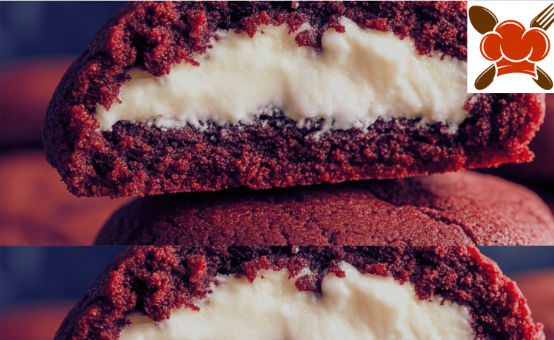
If you’re a fan of red velvet, prepare to take your dessert game to the next level. These Cheesecake-Stuffed Red Velvet Cookies combine the iconic flavor and texture of red velvet with a luscious, tangy cheesecake center. The result? A soft, chewy cookie that’s rich, creamy, and totally unforgettable.
Whether you’re baking for a special occasion or just want to treat yourself, this dessert is guaranteed to impress. Let’s dive into everything you need to know—from ingredients to baking tips—to create the perfect batch.
What Makes These Cookies So Special?
Imagine biting into a soft red velvet cookie… and discovering a creamy, sweet cheesecake surprise hidden inside. These cookies are all about contrast—soft on the outside, creamy on the inside, and just the right balance of sweet and tangy.
Ingredients You’ll Need
To create these decadent cookies, you’ll prepare two simple components: the red velvet cookie dough and the cheesecake filling.
For the Red Velvet Cookie Dough:
- 1¼ cups (160g) all-purpose flour
- 2 tablespoons (15g) unsweetened cocoa powder
- ½ teaspoon baking soda
- ⅛ teaspoon salt
- ¼ cup (60g) unsalted butter, softened
- ½ cup (100g) granulated sugar
- ¼ cup (50g) packed brown sugar
- 1 large egg
- 1 tablespoon milk
- 2 teaspoons vanilla extract
- 1 teaspoon red food coloring (gel preferred)
For the Cheesecake Filling:
- 4 oz (115g) cream cheese, softened
- ¼ cup (50g) granulated sugar
- ½ teaspoon vanilla extract
Step-by-Step Instructions
1. Make the Cheesecake Filling
In a bowl, mix the softened cream cheese, sugar, and vanilla until smooth and creamy. Scoop teaspoon-sized portions onto a lined baking sheet and freeze them for at least 1 hour. This helps keep the filling intact during baking.
2. Prepare the Cookie Dough
In a separate bowl, whisk together the flour, cocoa powder, baking soda, and salt. In another bowl, cream the butter, granulated sugar, and brown sugar until light and fluffy. Add the egg, milk, vanilla extract, and red food coloring. Mix until smooth.
Slowly add the dry ingredients to the wet mixture, stirring until a thick dough forms.
3. Assemble the Cookies
Preheat your oven to 350°F (177°C) and line a baking sheet with parchment paper. Take 2 tablespoons of cookie dough and flatten it into a disk. Place a frozen ball of cheesecake filling in the center, then wrap the dough around it, making sure it’s fully sealed.
Repeat for the remaining dough and filling, spacing the cookies 2 inches apart on the sheet.
4. Bake and Cool
Bake for 12–14 minutes, or until the edges are set and the tops show slight cracks. Don’t overbake—this keeps the cookies soft and chewy. Let them cool on the pan for a few minutes before transferring to a wire rack.
Pro Tips for Cookie Perfection
- Freeze the filling: This makes stuffing easier and prevents it from melting too quickly while baking.
- Don’t overmix: Once you add the dry ingredients, mix just until combined to keep the dough light.
- Use gel food coloring: It gives a brighter red color without altering the texture of the dough.
- Chill sticky dough: If your dough gets too soft to handle, refrigerate it for 10–15 minutes before shaping.
Creative Variations to Try
Want to switch things up? Try these fun twists:
- Chocolate Boost: Add mini chocolate chips to the dough for extra richness.
- Holiday Vibes: Mix a few drops of peppermint extract into the dough for a festive flair.
- Peanut Butter Center: Swap the cheesecake filling for a blend of cream cheese, peanut butter, and powdered sugar.
Make-Ahead and Storage Tips
- Room Temperature: Store cooled cookies in an airtight container for up to 3 days.
- Freeze Before Baking: Assemble the stuffed cookies and freeze until firm. Store in a zip-top freezer bag for up to 3 months. Bake from frozen—just add a couple extra minutes.
- Freeze After Baking: Let cookies cool, then freeze in layers with parchment between them. Thaw at room temperature before serving.
Final Thoughts
Cheesecake-Stuffed Red Velvet Cookies are more than just a dessert—they’re an experience. From the deep red color to the creamy cheesecake surprise inside, every bite is pure indulgence. Perfect for holidays, birthdays, or cozy weekends at home, these cookies are sure to become a favorite in your recipe collection.
So grab your apron and treat yourself—you deserve it!
